|
Skills level: Intermediate Sometimes, when working with very large spreadsheets, you find yourself navigating back and forth from left to right trying to see all the data on your worksheet. It is quite a nuisance when you have a spreadsheet that has so many columns that does not fit all on your screen. But you also don’t want to delete the columns, because you might want to use the data in the other columns another time. Below is a list of client data. Initially, you only see data completed up to column M. 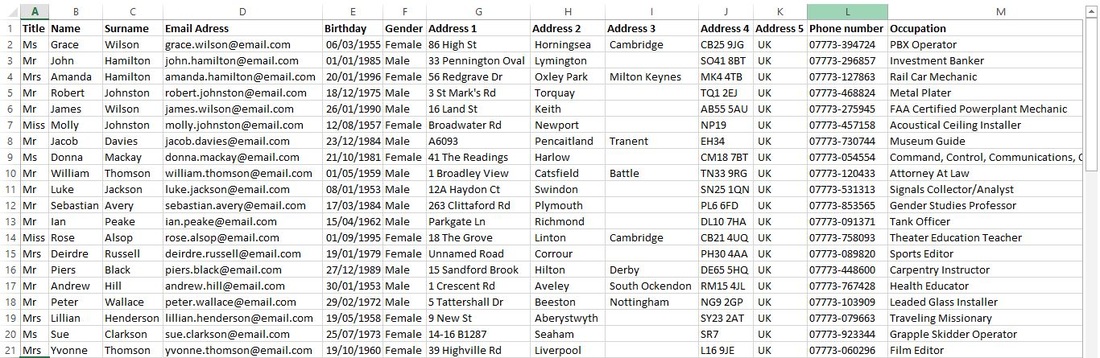 But if you scroll further to the right, there are more columns after Column M with more data. 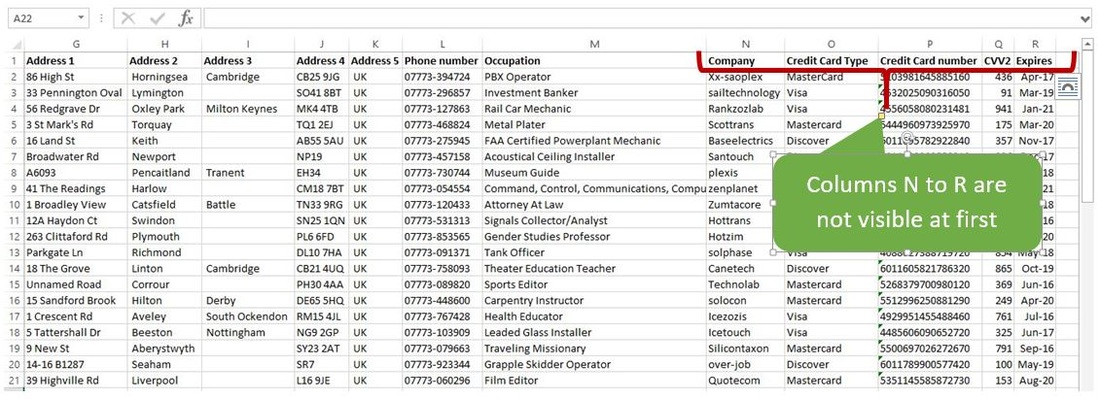 You do not usually need to see ALL the data fields all at once. For example, if you need to send an email to your list of clients – you would only need the Title, Name & Surname fields as well as the Email Address field. The rest of the data is unnecessary, and only gets in your way. To clean up your work area, you can easily hide the unnecessary data. The data will not be lost as it is not removed or deleted, it simply will not be displayed.  With all the columns highlighted that you want to hide, simply right click on any of the highlighted columns, and select the Hide option.  The columns will now be hidden from view. You can now go ahead and print this document, without having to worry about printing all of the unnecessary details. The data however is still there. You can see between Column D and S, there is a faint double line. This shows that there is in fact data between these two columns (and the fact that there are a couple of letters of the alphabet missing between D and S, should also tell you that the letters in between are hiding).  You will also notice that if you navigate from cells in Column D to cells in Column S (go ahead and select Cell D1, and use the right arrow key on your keyboard to navigate to cell S1) that the information in the hidden cells is not accessible while it is hidden. To unhide the cells again, the same simple process can be followed. You can do this in one of 2 ways. Where the faint little double lines are displayed, place your cursor on top of it until it changes to a double-headed arrow, then click and drag to the right to unhide the hidden column. You will see the width of the column change as you do it, and the data in the column just left of column S will be displayed as soon as you let go of the cursor. 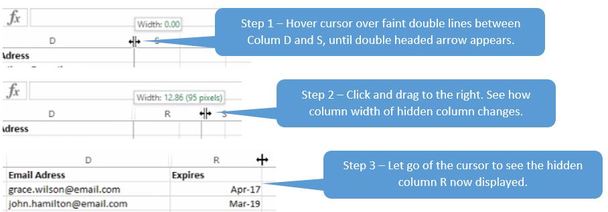 You have to repeat this process multiple times if there are more than 1 hidden column -almost like the magician’s magic silk scarf that he pulls from his sleeve one colour at a time. Another method (a bit quicker), is to highlight the column to the left and to the right of the hidden data (in this case column D and S) by clicking on column D and dragging to column S to highlight both. Right click on one of the highlighted columns again, and select “Unhide” this time. 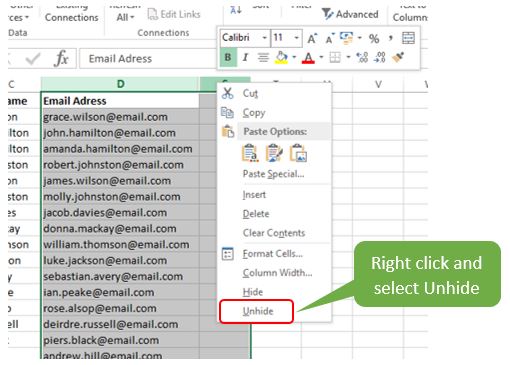 All of your data in all of the columns will now be visible again. You can select any number of columns to hide at a time. You can hide them one by one, or select multiple columns to hide at the same time. An easy way to select multiple columns to hide, when they are not adjacent to each other is to click the control key on your keyboard, hold it in, and select individual columns one by one to highlight them individually. For example, if you want to hide Title, Birthday and Phone number, hold in the Control key, and use your cursor to click on column A, E and L. Let go of the control key, right click on any one of the highlighted columns and select hide to hide these 3 columns at the same time.  The exact same methods above can be used to hide rows. Let’s return to the data sheet with rows E to R hidden. Maybe you have already sent the email in question to clients Molly Johnston and Andrew Hill. You would therefore prefer not to include their details on the worksheet before you print it. Go ahead and highlight rows 7 and 17 (once again, you can either hide one at a time, or hit the Cntrl button on your keyboard, hold it in, and then select row 7 and 17). Right click on any one of these two row numbers and select Hide. 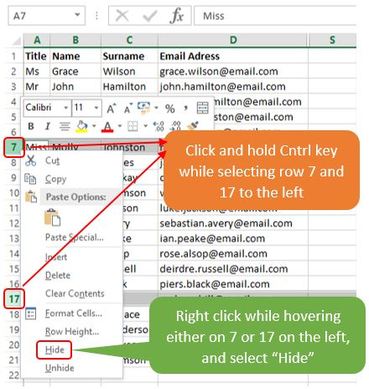 The same faint double line will appear to the left between rows 6 & 8, and 16 & 18 to show that there are some records hidden from view. To unhide, highlight the rows to the top and bottom of the hidden rows by clicking and dragging. Right click and unhide. To unhide multiple rows hidden in a whole list of data, you can select all the rows (1 to 21 in the above example) and right click and unhide. It will unhide all of the hidden rows contained in the highlighted section. This way you can also be sure that you did not accidently miss a hidden row. Unhide Column A or Row 1 So if Column A is hidden, you may wonder how to unhide it, since there is no column BEFORE it to highlight together with Column B before right clicking and selecting unhide. This one is quite tricky to explain, but easy to do. So… Imagine that there is another column to the left of column A. So click on Column B to highlight it, and drag to the left. You will see the highlighted area will change slightly as follows: 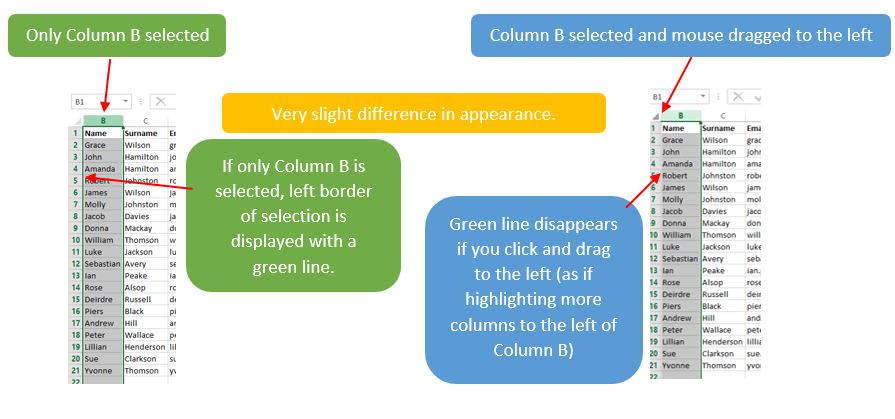 After you have clicked on Column B, dragged to the left to include Column A (even though it is not visible), you can right click on column B and select unhide.
The same applies to unhiding Row 1. Click and hold Row 2, drag up to Row 1 (as if there is another Row above Row 1), right click on Row 2 and select unhide.
2 Comments
Andro
27/8/2016 15:24:27
Skill level for this maybe beginner rather than intermediate? Love it though...can't wait for some more serious stuff!
Carine
29/8/2016 21:22:09
Hi Andro. Thank you for your comment. I actually agree with you. You will be surprised that I actually found the hide and unhide function in an Advanced Excel course syllabus! If you are a regular Excel user, you will often find "advanced" concepts quite easy. The traditional Basic, Intermediate and Advanced Excel levels actually ignore a whole universe of additional functionality in Excel. The real fun only starts AFTER the advanced level. I plan to write about more exciting "stuff" soon, so keep posted! :) Leave a Reply. |
Carine HoughHi, and welcome to my blog :) I am an Excel enthusiast and want to help others keen on improving their own Excel skills. I hope you learn something useful on my blog. 
Categories
All
|
